How to Grow Aloe Vera Indoors: 15 Proven Tips for Thriving Plants

Some of the links in this post are affiliate links. As an Amazon Associate, we earn a referral fee from qualifying purchases—at no extra cost to you.
Table of Contents
Are you dreaming of a lush, thriving Aloe Vera plant right in your home? Good news—you can make it happen! Aloe Vera isn’t just a stylish houseplant; it’s a powerful multitasker that purifies air and offers healing properties. In this guide, you’ll learn everything you need to know about how to grow Aloe Vera indoors. Whether you’re a seasoned plant parent or a beginner, these tips will set you up for success.
The Benefits of Growing Aloe Vera Indoors
Aloe Vera acts as a natural air purifier by removing toxins like formaldehyde and benzene while also releasing oxygen at night to promote better sleep and well-being. Caring for Aloe Vera can be a calming, stress-relieving hobby that benefits both your mind and living space. Additionally, growing Aloe Vera indoors provides a convenient source of fresh, chemical-free gel for soothing burns, minor cuts, and irritated skin. Simply cut a leaf, extract the gel, and apply it directly for instant, natural relief, making Aloe Vera a handy healing tool at home.
Choosing the Right Aloe Vera Variety for Indoors
Not every Aloe Vera plant is ideal for indoor growing, so picking the right variety matters. Aloe barbadensis is one of the most popular choices because it’s easy to manage and highly resilient. You can also consider Aloe aristata, known for its unique, speckled leaves, or Aloe vera chinensis for a slightly different look. These varieties adapt well to indoor conditions and add a decorative touch to your space.
If you’re starting from scratch, an Aloe Vera Starter Kit can provide everything you need to grow your first Aloe Vera plant. The kit includes seeds, a pot, and soil mix tailored for successful Aloe Vera growth. It’s a great option for beginners who want a hands-on approach to cultivating their plant.

How to Choose the Best Spot for Aloe Vera Indoors
Aloe Vera thrives in bright, indirect sunlight, so place it near a sunny window for 6–8 hours daily or supplement with a full-spectrum grow light if needed. Proper lighting keeps its leaves strong and vibrant, while the ideal temperature range of 60–75°F (15–24°C) ensures healthy growth. Protect your plant from drafty windows, air conditioners, and cold breezes to prevent stress. Since high humidity can cause fungal issues, maintaining a dry, warm environment is key to a happy Aloe Vera.
Picking the Ideal Pot for Aloe Vera
Good drainage is crucial for Aloe Vera’s health because trapped water around the roots can cause deadly rot, so always use a pot with drainage holes. Terracotta pots are ideal since their porous material improves air circulation and helps wick away excess moisture. Plastic pots can retain too much water, making them a riskier choice unless you water very carefully. Choosing the right pot and ensuring proper drainage creates a dry, breathable environment that keeps Aloe Vera thriving.
Choosing the right pot for Aloe Vera is key to its health. A classic Terracotta Pot with Drainage Holes ensures proper airflow and moisture control, making it ideal for Aloe Vera’s needs. The porous material helps prevent waterlogging, keeping your plant’s roots dry and healthy.

Selecting the Perfect Soil Mix for Aloe Vera
Aloe Vera needs fast-draining soil with a sandy, gritty texture to prevent soggy roots, similar to its native desert environment, and pre-made cactus or succulent mixes work perfectly. You can also make your own by combining one part coarse sand, one part perlite, and one part organic potting soil for a nutrient-rich, well-draining blend. This DIY mix supports healthy growth while protecting the roots from excess moisture. Always avoid heavy, moisture-retaining soils that can trap water and suffocate the plant.
Aloe Vera thrives in a well-draining, sandy mix. This Cactus and Succulent Soil Mix is designed to provide the perfect texture and drainage for your Aloe Vera plant, ensuring its roots stay healthy and free from rot. A great option for both new and experienced plant owners.

Fertilizing Aloe Vera: Tips for Indoor Care
Fertilize your Aloe Vera in spring and summer using a diluted cactus fertilizer every 4–6 weeks, but avoid feeding during fall and winter when the plant is dormant. Always use a light hand with fertilizer, as Aloe Vera is sensitive to overfeeding. For a natural option, banana peel water or compost tea provides gentle, chemical-free nutrients. Simply soak banana peels in water and use the liquid to nourish your plant, keeping it strong and vibrant.
Repotting Aloe Vera: When and How to Do It
Repotting aloe vera every two to three years is essential to refresh the soil, prevent root rot, and give the plant more space to grow. Signs that your aloe needs repotting include roots peeking out of drainage holes, top-heaviness, soil drying too quickly, yellowing leaves, and stunted growth. When repotting, gently remove the plant, trim any damaged roots, and place it in a slightly larger pot with fresh, well-draining soil, watering lightly afterward. Regular pruning of dead leaves and careful removal of pups keeps your aloe healthy, encourages fresh growth, and provides you with new plants to nurture or share.
How to Harvest Aloe Vera Gel
Harvesting aloe vera gel is easy and rewarding, but it’s important to select mature, thick leaves near the plant’s base and use clean, sharp tools to make a clean cut close to the stem. After harvesting, wash the leaf, trim the spiky edges, slice it open, and gently scoop out the clear gel into a clean container. Fresh gel can be refrigerated for up to a week or frozen in ice cube trays for longer storage and convenient use. Proper harvesting and storage preserve the gel’s quality while keeping your aloe vera plant healthy and productive.
Common Pests and Diseases in Indoor Aloe Vera
Aloe vera plants, though hardy, can face pest issues like mealybugs, spider mites, and scale insects, as well as fungal diseases due to factors like overwatering. Regularly inspect your plant for signs like cotton-like clusters or webbing, and treat pests with neem oil or a mild dish soap and water solution. If root rot is suspected due to mushy, smelly roots, trim the affected areas and repot the plant in fresh, dry soil. For ongoing pest prevention, clean the leaves regularly and consider adding essential oils like peppermint or tea tree to your homemade solution for added effectiveness.
To tackle common pests like mealybugs and spider mites, try Neem Oil for Pest Control. It’s an organic solution that effectively controls pests without harming your plant. A must-have for maintaining healthy, thriving Aloe Vera.

The Basics of Hydroponic Aloe Vera
Select a sturdy aloe vera plant and gently rinse its roots to remove any remaining soil. Fill a container with clean, filtered water and suspend the plant so that only the tips of its roots touch the water. Aloe vera roots need plenty of oxygen, so avoid submerging them completely. Add a diluted hydroponic nutrient solution to the water to supply essential minerals.
For those interested in hydroponic growing, a Hydroponic Growing System Kit provides everything needed to grow Aloe Vera without soil. It’s an easy-to-use system that ensures your Aloe Vera thrives in a water-based environment, complete with necessary nutrients and a grow light.

Seasonal Care Tips for Aloe Vera
Aloe vera’s care needs change with the seasons, especially when kept indoors. During winter, reduce watering and ensure the soil is completely dry between waterings to prevent root rot, while placing the plant in a bright spot like a south-facing window and protecting it from cold drafts. In summer, increase watering as the plant enters its active growth phase but always let the top 1–2 inches of soil dry out before watering again, and consider moving it outdoors to a spot with bright, indirect sunlight. To boost growth in summer, feed your Aloe Vera once a month with diluted cactus fertilizer and adjust care based on the season to keep your plant healthy and thriving year-round.
How to Propagate Aloe Vera Indoors
To propagate Aloe Vera indoors, gently remove the plant from its pot, separate the pups with their roots attached, and let them dry for a few hours to prevent rot. Use a clean knife or shears to cut the pups away neatly, allowing the cut surfaces to heal before planting. Plant each pup in a small pot with well-draining soil, water lightly to settle the roots, and place them in bright, indirect light while avoiding overwatering. Newly separated pups need careful monitoring, protection from harsh sunlight, and minimal watering until they are well established and thriving.
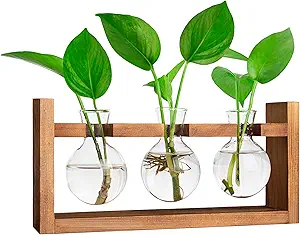
Propagating Aloe Vera is a rewarding process, and a Propagation Station for Plants provides a stylish, organized way to grow new Aloe Vera pups. This station allows you to propagate multiple plants in an efficient and aesthetically pleasing way.
Troubleshooting Indoor Aloe Vera Problems
Yellowing leaves in Aloe Vera can be caused by several factors. Overwatering is a common issue, as Aloe stores water in its leaves and roots, making it susceptible to rot when the soil remains soggy. Insufficient light is another cause; Aloe Vera needs 6–8 hours of bright, indirect sunlight daily, and lack of it can cause yellowing and weak growth. Additionally, poor drainage, compacted soil, or pest infestations like mealybugs can contribute to yellowing, so it’s important to check for pests, inspect the roots for rot, and ensure proper airflow around the plant.
If you’re struggling with overwatering or underwatering, a Soil Moisture Meter can help you gauge your Aloe Vera’s moisture levels. This tool ensures that you’re watering at the right times and avoiding root rot.

Conclusion
Growing Aloe Vera indoors is a rewarding journey that brings beauty, health benefits, and a sense of accomplishment. Whether you’re propagating new plants, troubleshooting issues, or simply enjoying the vibrant greenery, Aloe Vera adds a touch of nature’s magic to your home. With proper care, your Aloe Vera will thrive and reward you with its resilience and versatility for years to come.
How to grow Aloe Vera indoors – FAQs
1. How much sunlight does aloe vera need indoors?
Aloe vera thrives in bright, indirect sunlight. Place it near a south- or west-facing window for the best results. Avoid direct, harsh sunlight, as it can scorch the leaves.
2. What type of pot and soil should I use for aloe vera?
Use a pot with drainage holes to prevent waterlogging. A well-draining potting mix, such as one formulated for succulents or cacti, is ideal.
3. How often should I water indoor aloe vera?
Water deeply but infrequently, allowing the soil to dry out completely between waterings. Overwatering can lead to root rot, so err on the side of caution.
4. What temperature is best for growing aloe vera indoors?
Aloe vera prefers temperatures between 60°F and 75°F (15°C to 24°C). Protect it from drafts, cold temperatures, and sudden temperature changes.
5. Do I need to fertilize my indoor aloe vera plant?
Aloe vera doesn’t require frequent fertilization. Use a diluted succulent or cactus fertilizer once during the growing season (spring or summer) for optimal health. Avoid fertilizing in fall or winter.
Other useful resources related to how to grow aloe vera indoors
- The Old Farmer’s Almanac – Aloe Vera Plant Care
- Instructables – How to Care for Aloe Vera
- Good Housekeeping – Aloe Vera Plant Care Guide
- Henry Shaw Cactus and Succulent Society – Aloe Pests and Diseases
- Martha Stewart – Aloe Vera Plant Care Guide
Some Interesting growing Aloe Vera videos
Another interesting blog about growing plants – https://indoorfarminghub.com/embrace-eco-friendly-indoor-farming-now/